Enhance Your Python-vscode Workflow
This post covers my personal workflow for python projects, using Visual Studio Code along with some other tools. A good workflow saves time and allows you to focus on the problem at hand, instead of tasks that make you feel like a robot (machines are good for that).

Install vscode, and follow the topics below to set up your development environment.
Topics
1. Remote - WSL
I prefer using a unix shell as my command-line interface. Luckily, Microsoft has implemented a great tool that allows developers to run linux distributions natively on Windows. Here’s a small guide on how to install Ubuntu on Windows.
Assuming you have already installed vscode, you can select bash as your default terminal by adding the following line to your vscode settings:
{
  "terminal.integrated.shell.windows": "C:\\Windows\\sysnative\\bash.exe"
}
When you open a project folder, you can install the Remote-WSL extension to use WSL as your development environment. After installing the extension, open the command palette with ctrl + shift + P and select Remote-WSL: Reopen folder in WSL:
When you open the terminal using ctrl + `, you should see your bash shell by default.
2. Virtual Environment
Create a new folder called “demo”, and open it in vscode:
code demo # if this doesn't work, open vscode manually and run `shift + ctrl + P`, then run "Shell Command: Install 'code' command in PATH"
Use this guide to create a virtual environment inside the demo folder. A folder called demo/.venv/ will be created, containing all dependencies and the python interpreter for the virtual environment, which can be referenced by setting a relative path in your vscode settings:
{
  "python.pythonPath": ".venv/bin/python"
}
The next time you start up vscode in this folder, it should automatically activate your virtual environment, and select the right interpreter.
3. Python Extension
To be able to properly use vscode for python development, you should install the Python extension in vscode. Press ctrl + shift + X to open the extensions tab, and search for “Python”.
Debugger
The python extension has a debugger built right in. You can activate the debugger by pressing F5. I normally prefer to set up a .vscode/launch.json file with different debug configurations, but just testing a file will do for now:
As you can see, you can watch and modify variables on the fly. You can also stop code execution upon triggering an expression by adding one in the Watch pane, for example:
isinstance(your_name, str) # when 'your_name' becomes type 'str', the debugger will stop execution
The debugger makes your life much easier, allowing you to inspect objects and modify variables to discover edge-cases more easily.
Jupyter
The python extension also has jupyter support built-in.
mkdir notebooks && touch notebooks/notebook.ipynb
When you click on the notebook, it will open:

It’s quite useful when you want to read the notebooks, but if you want to run cells, you need to have jupyter installed:
pipenv install -d jupyter
I’ll have to mention one useful feature called autoreload, which allows you to automatically reimport modules in your notebook as you change them:
# Load the autoreload extension
%load_ext autoreload

# Autoreload reloads modules before executing code
# 0: disable
# 1: reload modules imported with %aimport
# 2: reload all modules, except those excluded by %aimport
%autoreload 2
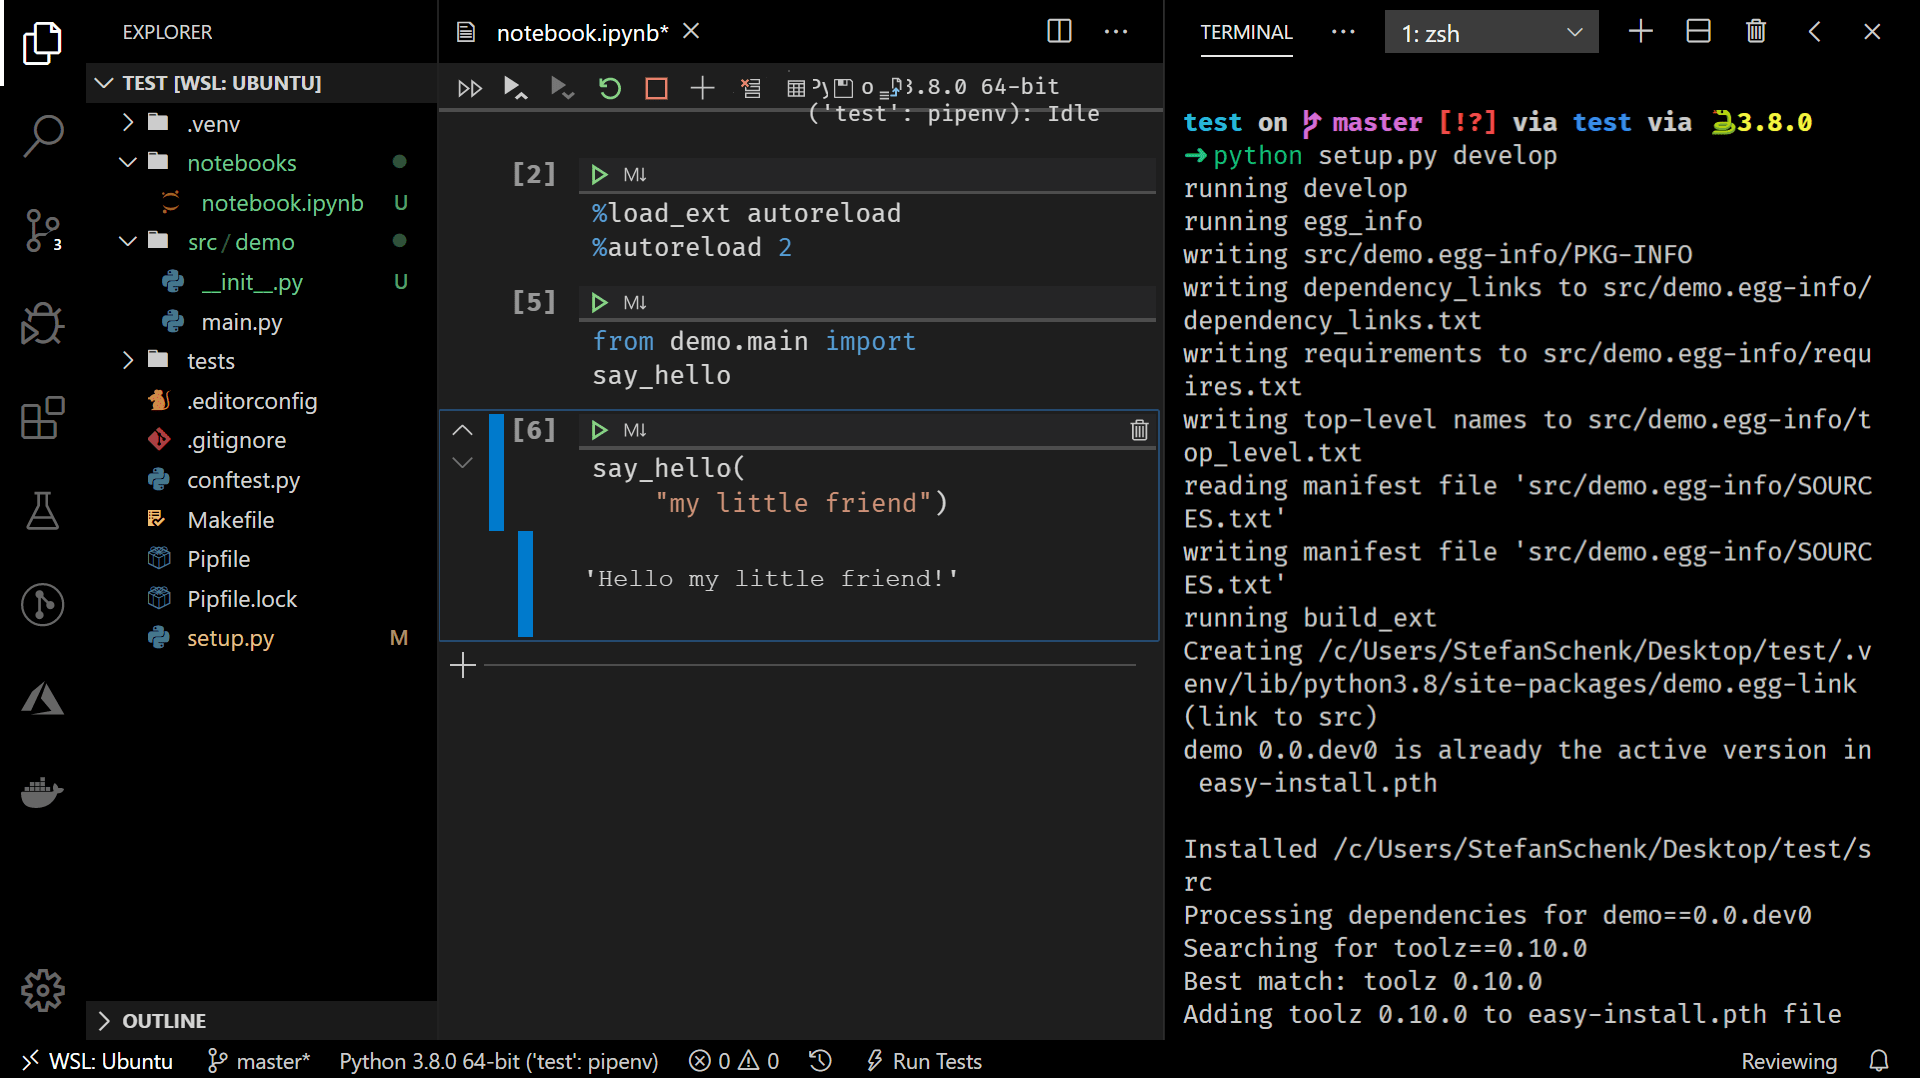
For example, here I’m installing my source code in develop mode, and I import my installed source code into my notebook using autoreload:

If this doesn’t work for you, you may have to install your python project. You may have noticed the extra file setup.py in the root of the project folder. To install the project, you must run this file like so:
pip install -e . # about the same as `python setup.py develop`
Testing and Linting
Although the python extension has a linter included, you can also define your default linting and testing frameworks in vscode settings. After installing the desired frameworks:
pipenv install -d mypy autopep8 \
  flake8 pytest bandit pydocstyle
You can also use these tools in your terminal, learn more about it here.
The settings of vscode can be overridden by workspace settings per project.
{
  "python.autoComplete.addBrackets": true,
  "python.formatting.provider": "autopep8",
  "python.jediEnabled": false,
  "python.linting.mypyEnabled": true,
  "python.linting.flake8Enabled": true,
  "python.linting.pylintEnabled": false,
  "python.linting.pydocstyleEnabled": true,
  "python.testing.unittestEnabled": false,
  "python.testing.nosetestsEnabled": false,
  "python.testing.pytestEnabled": true,
  "python.testing.pytestArgs": [
    "tests"
  ]
}
Some of these frameworks produce temporary folders, which can clutter your file explorer, and slow down file indexing. You can disable indexing for these files by passing a glob pattern to the files.watcherExclude field.
{
  "files.watcherExclude": {
    "**/build/**": true,
    "**/dist/**": true,
    "**/.ipynb_checkpoints/**": true,
    "**/*.egg-info/**": true,
    "**/.pytest_cache/**": true,
    "**/__pycache__/**": true,
    "**/.mypy_cache/**": true,
    "**/.venv/**": true
  },
  "files.exclude": {
    "**/.pytest_cache/**": true,
    "**/.mypy_cache/**": true,
    "**/__pycache__/**": true,
    "**/*.egg-info/**": true
  }
}
You can run tests from the Test sidebar:

Learn more about testing python code in my previous post.
4. Editorconfig
Finally, you can install the editorconfig extension for vscode.
When you’re collaborating with other developers, who use other editors and settings, you may run into the problem of having different line endings, and other idea’s about using tabs or spaces.
Adding a .editorconfig file to your projects root folder can make it really easy to prevent differences in editor configurations:
root = true

[*]
charset = utf-8
indent_style = spaces
indent_size = 2
end_of_line = lf
trim_trailing_whitespace = true
insert_final_newline = true

[*.py]
indent_size = 4


